How To Integrate Bitrock InstallBuilder with Eclipse
Published on
Did you know that it is possible to integrate InstallBuilder into your development environment?
You may already be familiar with the advanced GUI builder that was added in InstallBuilder 6. You can access most InstallBuilder features from the GUI, so you can develop complex installers without writing a line of code. However, there are situations in which that is not the ideal way to work with InstallBuilder. In addition to the GUI builder, you can work directly with the XML project file or interact with the tool using the command line interface. Both the XML project file and the command line builder interface turn InstallBuilder into a powerful development tool that can be integrated into your development environment.
There are a variety of Integrated Development Environments (IDEs) that support functions such as source code editing, compilation, automation and version control. You can also integrate the packaging functionality that BitRock InstallBuilder provides because most IDEs can be configured to use external tools.
In this article, we'll explain how to configure Eclipse to package your software with InstallBuilder. The configuration with other IDEs would be similar to this. This article is focused only on the basics - more complex configuration can be done to further customize your environment.
Getting BitRock InstallBuilder
To get started, you need to have InstallBuilder installed on your system. You can download the latest version from http://installbuilder.bitrock.com
To install InstallBuilder, you can either click through the steps presented by the GUI installation wizard or you can run the installer in unattended mode. In this case, we'll install it in unattended mode. Once you have downloaded the edition you'd like to use, you just need to execute from a command line console:
$ installbuilder-enterprise-6.1.0-linux-installer.bin –mode unattended –prefix /path/to/installation/directory
Creating a demo project in Eclipse
If you don't already have Eclipse installed in your system you can get it and the installation instructions from http://www.eclipse.org.
Once it is installed, open it and go to [File tab –> New –> Project]. You will be prompted to select a resource, select [General –> Project]. In our example we'll use 'demo' as name of the project.
If you don't see the screen below, you may want to enable the navigator view. To do so, go to the Window tab –> ShowView and look for the 'Navigator' and 'Console' views.
To demonstrate the integration, we'll build one of the demo installers that are bundled in InstallBuilder. Let's use the example for the parameter screens. Import the project file parameters_example.xml that you can find in <installbuilder-installation-directory>/projects/examples/parameters.
To import a file in Eclipse, right-click on the project name and select [Import]. Then select [General –> File System] in the window that appears and navigate through your file system to select the XML project file, docs and img folders.
As you can see, the source of InstallBuilder is an XML file.
Configuring Eclipse to build an Installer with InstallBuilder
Now we are going to configure InstallBuilder as an External Tool. Go to [Run tab –> External Tools –> External Tools Configuration].
Right-click on [Program] and select [New]. Configure Eclipse by pointing it to the InstallBuilder builder tool, selecting the current project as the working directory and adding the appropriate arguments (build projectfile.xml platform). In our example, we need to use:
build parameters_example.xml linux
We can add it to 'Favorites' so this functionality can easily be accessed. Go to the Run tab –> External Tools –> Organize Favorites and select the configuration we have just created:
Now in [Run tab –> External Tools] you should have the [Build Installer] option.
Now it's time to test if our configuration is correct. Go to [Run tab –> External Tools –> Build Installer] and it will start to generate the installer for our demo application. If you have the 'Console' view enabled, you will see the installer being generated:
Configuring Eclipse to Test the Generated Installer
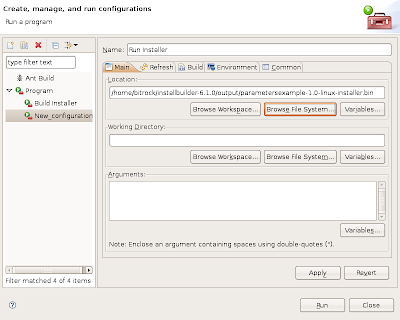
You can now test your installer. In the same way you added InstallBuilder as an External Tool, you can add the generated installer and launch it. Below, you can see the configuration for the new External Tool. Remember to add it to your Favorites to make it easier to access.
Give it a try! You will see your installer being launched from Eclipse.
Before we wrap up, you know that InstallBuilder is a cross-platform installer, right? And that you can build installers for different platforms without the need to switch your development environment? Yes, you can build installers for Linux, OS X and Windows all from a Linux machine. If you have your development environment on Linux and you have 'wine' installed, you will also able to test your Windows installer from your development environment.
We have also made a video that shows how to integrate InstallBuilder with Eclipse:


